Sunday, March 14, 2010

Etsy Goodie Goodies Team Egg Hunt Giveaway!

Alright! Listen up!

One of the Teams I belong to on Etsy is having a FREE GIVEAWAY worth 150 USD just in time for Easter!!! There is a Creative Caravan Scarf thrown in with the other goodies. If you would like a chance to win, (This is open worldwide! Go Emirates and Turkey!!!)

Check this link out for details! Good Luck!!!!!!!!!

And Happy Early Easter!

XXMelanie

Friday, March 12, 2010

Foray in to Silkscreening... On Glass!

So I've been looking at some glass online and I have been trying to figure out the process of transferring images to glass for a few months now. There is only one way to figure it out and that is to splurge sixty bucks on a beginner silkscreen kit!

Dad took me up to Kelowna and waited patiently for me as I picked out what I wanted at the art store. I had to beat myself off the nicer supplies, reminding myself I'd never done this before. (Well, except once when I was about fourteen years old in Mrs. Saul's class. I remember I did a hippie portrait of John Lennon and screened it on a t-shirt. But I digress....) I ought to have an instruction booklet. So with my big box of silkscreen goodies under my arm, I went home, ripped off the plastic wrap and laid everything out on the kitchen table. I felt like a little kid with new crayons! Fresh, shiny new supplies. Yes!

The apple tree image traced on the screen then painted in with turquoise drawing fluid. When painting the image on, the screen can't touch any surface, so that is my mother's pizza pan underneath it all. Worked like a charm! (the stuff I'm using is non-toxic, so no big worries!)

The first thing I did was draw out my design in pencil. Then I read the instruction manual, to be told that I had to wash the screen in soapy water first, then seal the edges with masking tape. Damn! I knew there was a reason I wanted the instruction manual. So I did things a little backwards- I painted in the drawing fluid after the screen was generally dry from washing it. Then I let it sit overnight to completely dry, and then I taped it up the next morning and burnished it all down with the back of a spoon. (I love spoons!)

Thanks Dad, for having green masking tape on hand. Looks pretty!

Then, I had to repaint in the bits I missed with blue drawing fluid. Little pin pricks of light needed to be blocked. Once that was dry, I was ready for the terracotta screen filler.

Terracotta coloured screen filler, put in place by the same spoon that burnished the masking tape.

Once the turquoise drawing fluid was dry, it was time for the terracotta screen filler. I have to say I didn't expect these colours of turquoise and terracotta. I liked it though! Colour always makes things fun.

Colourful little screen waiting to be washed!

Next I took the plastic squeegee that came with the box and dragged the screen filler across the screen. You've got to do this in one swipe- the drawing fluid is water soluble so too many passes of the squeegee will dissolve the drawing fluid and your image will look like crap. I didn't do too badly, but you can see where I had to touch it up on the bottom right had corner- luckily it wasn't near the image! Phew!

No more blue!

Next I had to rinse the screen in the bathtub with the detachable shower head,with COLD water, concentrating on the image, both sides of the screen. I have to say, it was a satisfying feeling watching the image appear, knowing this was the last step before silk screening. It meant it was going to work! Yay!

Silkscreening the blue glass paint onto clear glass.

My silkscreening kit is for fabrics. I can make t-shirts and stuff with this funky little apple tree now. But I wanted to try glass first. So I cleaned up a piece of clear glass and put it under the screen and applied blue glass paint just as I did the screen filler. (I have no idea how that sreen filler is ever going to come off the screen! I guess the instruction booklet might tell me.) I've included the ghetto little squeegee so you can see what it looks like. It works though! So I can't complain.

One nice thing about silk screening on glass- if you don't like it, you can wash it! Unlike paper. I didn't like the first few I did. Too faint in the leaves so I experimented rubbing the paint in with my finger. If I rubbed too much, the design bled. So I found a nice happy medium, a little squeegee, a little rubbing and voila, I silkscreened successfully on glass!

Checking which colours look good. the problem is, the glass paint might change colour in the kiln. For instance, the pink paint here says dark red on the bottle. I had to be careful which colour I put behind the image, because I don't know what it's going to do in the kiln. I'm hoping it turns dark red.

It didn't take long to dry, but it was easy to scratch the paint if I wasn't careful. So I headed over to Larry's glass studio and began constructing some experiments. Larry's back now and Mitch is gone. Larry was both perplexed and curious about my experiments!

Cream squares seems like a safe bet, in case this turns colour! You cans see the paint is on the outside, so there is a slight shadow.

So I made two kinds of plates (three altogether)- One that has the paint on the outside, the bonus is that the design is three dimensional and casts a shadow on the coloured glass. I think it looks cool, but the down side is that the paint can be scratched off before being fired. The second one has the paint sandwiched between glass on the inside, meaning the image is protected completely but there is no shadow.

This one has the paint on the inside, so I couldn't use any glue to hold the cream piece in place. Those little blue squares are glued so it shouldn't shift in the kiln... hopefully! Notice this image is reverse compared to the pink image above? One of the benefits of printing on clear glass!

They are in kiln now~ check back to see how they turn out!

XXMelanie

Thursday, March 11, 2010

A quick lesson in Collage/Block Printing.


Recently I was asked by a new friend if I could show her how to block print. If her and I were in the same hemisphere, I would have invited her over for an afternoon of getting messy with paint, but since she is in Istanbul and I am in rural British Columbia, I decided to search through some old photos and to share them here. This is for you, Kelly! Recognize the living room? (Kelly now lives in my old Istanbul flat.)

Anyway. Block printing. I admit I really started carving blocks when I lived in Taiwan. Why? Because it's cheap, and I didn't need a press. In fact, you can do all of it sitting in front of the TV watching Ian Wright of Lonely Planet after a hard day's teaching, and you can plan your next travelling adventure at the same time! Oh those were the days...

Taipei also had a fantastic paper store. I can't remember how I found this paper store, but I bought so much paper from them, I had to start collaging it into block prints in order to justify visiting and buying more. I started lifting prints ideas out of Japanese comics. I remember coming up with a line about how I was lifting the low grade comic into the high end art world, but it was just a line. I really just liked the way it looked. I'll try to find those prints and put them here in a later blog, but here is one of my favourites: How to Make Sushi! Remember the coloured parts are paper, and the black parts are carved out of a lino block. There are many ways to block print. This is by no means the traditional way.

How to make Sushi! Made in Taiwan. By me.

So first of all, you need to get some lino and a sharp exacto knife and carve out your image. I tend to draw out my image in pencil first, and then tape it like mad to the lino block so it doesn't move. Then I scribble all over the back of a paper with a ball point pen. I don't know why, but it's the best for transferring the image. Then I rip all the paper off. Because pencil has a tendency to rub off quickly on the rubber I go over the image again with the ball point pen. Then I get to carving! I will admit, I have gashed myself pretty badly with exacto knives in the past. But we aren't talking about that, are we?!!!

A few blocks: The grey stuff is crumbly (not ideal) but can be found anywhere. The cream stuff is called safety cut and weighs a tonne and it's not cheap, but it's nice to carve. It's like a really big eraser. It had been dragged from country to country with me until it found its purpose in Istanbul. Strangely enough, it's the only stuff that will block print on the scarves.

Mucha Inspired Gypsy Block

A little mosque I drew between Abu Dhabi and Dubai on the bus one day.
You can still see the ball point pen clearly on this one.

Supplies! Block print, brayer, piece of glass or metal to roll the ink out on and paper.
That's it!

Now that you've got your block, you need paper. You can print on regular paper, or you can jazz it up with collaging paper. Luckily for me, I have sister who is a collaging whizz. With the Belly Dancer, (Sheherazade) we opted to print both the image on paper, and on the coloured paper for collaging, and cut and paste the different coloured papers in place. This would have been less tricky had we been using oil based paints. We had to be careful not to smudge the water based paint with the glue.

Next comes the inking. Roll the ink out till you hear a scratchy sound. If you don't hear anything, it's because you have either too much ink (Does the ink run in legs on the brayer?) or not enough (It will look dry).

I like to put my paper on top of the image and burnish the lines with the back of a spoon. I've used all the special things you can use in an art store for burnishing, but the back of a big spoon works the best in my opinion. Another note: You don't need to work on the floor. You can do this on a table, but for some reason Rene and I like to work on the floor. More space, I guess!

Eventually, you will end up with little bits of paper everywhere. You can throw away what doesn't print nicely.

Then your sister sits in the middle of the living room floor and cuts all those little bits out and arranges them in colours she likes.

Once it's all sorted, it gets glued down, signed and framed! Because no two prints can be exactly the same, these are not numbered, but rather listed as A/P (Artist's Proof.) Because I did most of the carving, and Rene did most of the printing and arranging, this is signed as one of our collaborative pieces.

Sheherazade's Corner, May 2009 Rene and Melanie Mehrer

Next time I'll show you a slightly different way! And yesterday, for the first time of my life, I bought a silkscreen kit. I'm branching out!

XXMelanie

Wednesday, March 10, 2010

Facebook Fan Page Up and Running!

This picture has nothing to do with anything.
But I took it last week and it seemed to be a good spring photo, so here you go!

Just a quick note today to let those of you who are on Facebook know that I have created a Facebook Fanpage for The Creative Caravan. Why? You might ask. Well, there are several good reasons.

One being, anyone can join the fan page. Please pass the link on to anyone you think might be interested. There have already been a few people who are interested in the same sort of thing I am, so we are meeting for the first time in cyberspace! The fan page makes things more interactive. People can post on the fan page wall as well so it's a much better way to communicate with people who might be interested in things we do or have some suggestions etc. Please join if you are interested!

Another reason is that I can do free giveaways from time to time to those fan page members who are deserving of a little Creative Caravan Love! Keep an eye out for those giveaways.

And third, I can quit bombarding my friends with my art and scarves! It separates my own personal Facebook account with Creative Caravan. The blog will always remain the same.

I look forward to seeing you over there!

This link will take you to the fanpage.

XX Melanie

Saturday, March 6, 2010

The Ice Wine Harvest


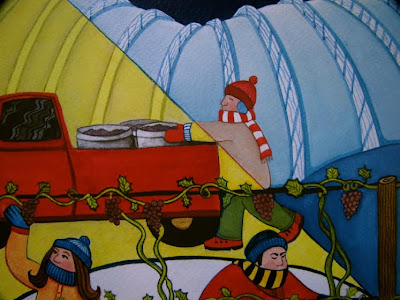
"The Ice Wine Harvest", Gouache on Watercolour paper, 11x14

I grew up in the Okanagan Valley, a region famous for fruit. When the cherries were ripe, I knew it was time for summer holidays. When the peaches were off the trees and the apples were on their way, it was time to go back to school. But now, with orchards being ripped out in favour of more lucrative vineyards, grapes are taking over my little valley. And with that comes ice wine.

I first heard about ice wine when I was living in Taipei. I had no idea what it was, but the Taiwanese loved it and coveted bottles of it imported from Canada. One day, as I was walking down the busiest shopping street of Chungsiao East Road, I happened to casually look into a store, and stop dead in my tracks:

Up along the back wall of the store, was a string of Canadians flags celebrating Canadian ice wine. But between each flag was another flag of a first Nations pictograph. I recognised this pictograph. I had drawn it several times as a young girl guide on a hike up through Paradise Ranch above Naramata. Yes, Paradise Ranch Ice Wine from Naramata was being not only sold, but celebrated in Taipei! That's when I realised how far reaching Naramata's wine industry had become.

Any idea how ice wine is made? This is what I have come to understand from the people chatting about it over coffee here in Naramata. Certain primo ice wine grapes are left on the vine well after the normal harvest. Some places even put nets over the grapes to keep them safe on the wine as they shrivel and the vine weakens under the cooler fall days. Everyone waits until the temperature hits minus eight degrees celcius and Wham! Once that happens, the grapes have to come off the vines as quickly as possible before the weather warms up again.


Usually, the first time it hits minus eight degrees is at night. On-call Pickers motor up to the vineyards and get to work, under bright flood lights set up so the pickers can see. Working quickly, the grapes are collected and crushed into wine before they thaw. As the water in the grape is still frozen, the nectar crushed out of the grape is sweet and thick- liquid gold. It takes a significant number of grapes to produce icewine, and since the process must be completed before in warms up (The grapes are useless if they thaw) it's costly, hence why ice wine is expensive.


In this painting, "The Ice Wine Harvest," I wanted to convey the feeling of the ice wine harvesters working quickly and in unison under a beautiful but cold Canadian winter sky. You should feel a little cold just looking at it!

And a little off topic but an interesting fact nonetheless: Canadian wine tends to have an extremely high sugar content and therefore alcohol content because of their prolonged exposure to the sun during our long summer days. In fact, it often has to have the alcohol content percentage brought down because it has too much alcohol naturally! Neat, eh?

Click here to see fantastic little video from Inniskillin Ontario that explains the process of making icewine.

I hope you like it~!
xxMelanie
KAWPPU6TT7X9

Thursday, March 4, 2010

Creative Caravan's Custom Orders and Latest Glass Projects!


My new Custom Order template for Etsy! I love these graphics. Can't get enough!

So I just had my first custom order from the Etsy Shop. A very sweet woman from the States wrote and asked if she could have the henna design on the cobalt blue scarf. I even asked her what colour of ink she wanted. I sent her a picture of the resulting scarf, she okayed it, and this morning I sent it off in the mail. Easy!

Zoe waiting patiently for me to finish mailing the package so we could go for a walk on this beautiful day! You got to love small towns. You can do stuff like leave your dog on the post office counter while you get your money out.

I'm really happy to have had the interaction. One thing I really loved about doing the markets is that I made lots of friends through the markets- I even found a boyfriend through a custom order once! He was getting a book made for a girl he liked. She didn't like him back. He ended up keeping the book and dating me instead! But on Etsy that is one thing I miss- I'm happy to mail scarves out to people who want them, but I have no idea who they are going to. It's a little less satisfying to send a package off in the mail and pray the recipient gets it. I'm not complaining, I'm just saying I miss the human interaction of this business. So this order was absolute fun for me and left us both happy and satisfied in the end! Don't be afraid to convo me if you are thinking about something special!

Block printing the Funky Bud!

Anyway, Just a reminder to those who might be interested in a new scarf, it's easy to order a custom made scarf. Just click the link below and you'll be taken directly to the Etsy shop.


Latest Glass Projects!


Brown, cream and blue grey striped serving plate
This one would be perfect for a baguette. I'm really curious to see how it will turn out- the stripe should morph a little in the slumping process. I made two of these, but I will have to wait a while before I see one- The mould is too long to be put in the small kiln, so we have to make enough stuff to fill the big one for a slump firing!!

Glass Scooter coasters, set of four each.
Again, I am a little disaapinted with this experiment. I bought black frit powder, block printed the glass with glass tac, and poured the powder over the images, and neatened them up with a dry paint brush. Not bad except the image was supposed to be black after firing. Oh well, I guess dotty grey is still okay.

Small Glass Plates.
These are bigger than coasters, but still small. They are waiting for the next slumping. At first I had the middle squares lined up, but then Mitch told me it wouldn't be me if they weren't skewed, and he was right. I left a clear line around the image, I hope you can see that in these photos.


Mitch's Coasters!

I thought I might have been an influence on Mitch, having just made some more stripy works, But alas, no. The colours are those of the Edmonton Eskimos. He's apparently a big fan.

Till Next time!
XXMelanie

Tuesday, March 2, 2010

The Debauchery of Two Teenaged Girls Home Alone on a Summer's Night

My mother recently told me a funny little story in the car on the way home from town and I thought it would be fun to share it on here:

One summer, when my sister and I were teenagers, probably around the ages of fourteen and seventeen, my parents decided to leave us for a night and go sleep on their motorboat on the lake. I don't think my sister and I had ever been on that boat; my father was constantly fixing it and bailing water out of the bottom of it, and was primarily used as a fishing boat for him and his buddies. Anyway, It was the hottest time of year and far too hot to sleep in the house, so the cool breeze coming off the lake seemed like a 'cool' idea, pardon the pun. We as teenagers were ecstatic! A whole night without the parents. We could do what ever we wanted without them ever knowing what it was that we did with the time they were away.

They had the dinner they'd packed and brought for themselves, admired the way the lake changed colours as it goes from dark blue to black once the sun was down and the stars were out. They settled into sleep for the night. The boat gently rocked them in their nautical bed,the sound of the waves lapping up against the side of the vessel, rocking them back and forth, much like a baby gets rocked to sleep. Back and forth, back and forth. They settled this way and that way. Back and forth, back and forth. Mom was starting to feel ill to her stomach. She sat up in bed, as much as one could in that cramped space.

"Are you still awake?"
"Yup. Too much rocking." Dad propped himself up on one elbow.
"I don't think I can sleep here."
"Me neither."

The boat was docked by eleven pm and they hopped into the car to come home.
"Well, I wonder what we will find when we get home?" Mom laughed.
"Will the girls even be home, I wonder? Or will they be out all night thinking we wouldn't catch them?" We had an eleven o'clock curfew.

"Well, they could be in the liquor cabinet or they might have boyfriends we don't know about over. We might even find out if they are into pot or not. In any case, we are going to find out what they like to get up to when their parents aren't around." Dad predicted.

When they arrived home, the lights were on. My parents decided to creep up the stairs as quietly as they could. They could hear Led Zeppelin coming from the stereo- a band we loved, but my parents hated, which was ironic because Zeppelin was more their era than ours. But with the music turned up as loud as it was, it was obvious we had settling in for a good, parentless night of..............................................................
...........................................................
........................................................
.....................................................
..................................................
..............................................
.........................................
.....................................
.................................
.............................
........................
...................
..............
..........
.......
.....
...
.
.
.
.

Art projects in the living room!

My neat-freak mother burst out laughing as we sat in the middle of the floor, paint, bits of paper, scissors, glue, what have you was spread in piles all over the carpeted living room floor, and my sister and I sat, with stunned guilty faces in the middle of it all, for having been caught making such a mess!


Wasn't quite the ending you were expecting, was it?

XXMelanie