Sunday, November 28, 2010

Peacock Debut in MyNaramata!


Thanks to Craig Henderson for using "Pearl and Co." to promote the upcoming Naramata Artisan Faire at the Heritage Inn & Spa on December 5th. Also, a big congratulations to Craig for being nominated Naramata Citizen of the year! Well deserved, my friend!

Here is the article in it's original form on MyNaramata (Click here) or you can read it below.


27th November 2010
Naramata’s Peafowl Make Fair Debut
Editor
~ CRAFT FAIR DECEMBER 5th ~
A local artist has whimsically captured the spirit of the village’s extended peafowl family, and her art will make its debut at the Naramata Christmas Craft Fair, Sunday, December 5th.

Melanie Mehrer uses a process called gouache, a watercolor-like medium. Mehrer’s blog site posted her latest piece a few days ago. It tells the story of the peahen and her three chicks being captured and taken away to a petting zoo in Keremeos.

“This part is a painful story for some village goers who really loved the peacocks. I loved the peacocks too, as Naramata is a magical little place and it just seemed fitting that peacocks should roam the village. But, maybe not an army of peacocks. I can understand the panic of some villagers who were suffering damage to their vehicles because the peacocks had a penchant for roosting on the tops of cars. Anyway, regardless of where anyone stands on the peacock issue, the peacocks are now imbedded in the history of this little village. I decided to create a painting celebrating the Peacock family of Naramata as it was last intact. As some villagers had named the female peahen ‘Pearl’ the title of this painting is ‘Pearl and Company,’” says Mehrer.

The fair goes from 11 to 4 at the Naramata Heritage Inn. The winebar and spa will be open too.

Artists and artisans from Naramata and the surrounding area will be showcasing their works and products for your shopping pleasure. Take time to get in out of the cold and find some unique and useful gift ideas while supporting the local economy. The Artisan Faire runs from 11am to 4pm on Sunday, December 5th. Contact Heather Mehrer for more information at 250-496-5486.

http://creativecaravan.blogspot.com/2010/11/introducing-peacock-family-of-naramata.html

http://www.mynaramata.com/cgi-bin/show_articles.cgi?ID=470&TOPIC=0


Thanks again, Craig! Pearl would be proud!
xxMelanie

Friday, November 26, 2010

Introducing, the Peacock Family of Naramata!

Remember that the most beautiful things in the world are the most useless; peacocks and lilies, for example.
-John Ruskin

"Pearl and Company" watercolour, 11x14, November 2010

A few years ago, a pair full grown peacocks showed up in Naramata. No one knew where they came from, and many residents didn't care. The peacocks made themselves at home in Naramata and were a common sight for those out taking walks around the village.

Teenage boy peacock with moulting white feathers

And then there were two babies that grew up to be two males. From the last photos I took of them, they had grown into teenagers, losing their white baby feathers and beginning to grow their long peacock tales. So then the village peacocks were four.

Pearl the Mama Peahen

And then this spring, three more baby peacocks were born. But someone had had enough of the peacock poop and called a trapper, and the female and the three babies were taken to a petting zoo in Keremeos. This part is a painful story for some village goers who really loved the peacocks. I loved the peacocks too, as Naramata is a magical little place and it just seemed fitting that peacocks should roam the village. But maybe not an army of peacocks. I can understand the panic of some villagers who were suffering damage to their vehicles because the peacocks had a penchant for roosting on the tops of cars. (You try to fly into a tree with such a heavy tail!)

The babies and their big bro.

Anyway, regardless of where anyone stands on the peacock issue, the peacocks are now imbedded in the history of this little village. I decided to create a painting celebrating the Peacock family of Naramata as it was last intact. As some villagers had named the female peahen "Pearl" the title of this painting is "Pearl and Company" and will have it's first public viewing at the Naramata Artisan's Faire at the Heritage Inn on December 5th.

See you there!

xx Melanie

Sunday, November 21, 2010

THe Ice Wine Harvest Mentioned in MyNaramata!


Is Ice wine season already here? It appears so!

"The Ice Wine Harvesters", 2010

Thanks to Craig Henderson and My Naramata for using my painting "The Ice Wine Harvesters" to illustrate the latest MyNaramata article on Ice wine.

The ice wine harvest is a fairly new cultural aspect to life in the Okanagan, as the boom in the Okanagan wine industry brings new chores. The grapes must be picked the first time they are naturally frozen by falling outside temperatures, and they must be processed while still frozen in order to squeeze out the waterless golden nectar which is ice wine. I tried some at Inniskilin this summer (at the long-distance urging of my fantastic friend John Atwell) And all I can say is that I am happy it's so expensive otherwise I may have a problem! It's that good!

The original of the "The IceWine Harvesters" and some prints (from Naramata and Istanbul) will be available at my booth in the Naramata Artisan Faire held in the Heritage Inn on December 5th. (Rumour has it I'll be down stairs somewhere across from the winebar. Woo Hoo!) I'll have some other works of mine and a special hand pulled print of the old Naramata Train Docks created by my sister Rene as well!

Rene's nostalgic print, "The TrainDocks", November, 2010.

See you at the Heritage Inn, December 5th!

For the MyNaramata Article click here.
For Rene's post on her traindock print, click here.
And to see the original blog on the icewine harvesters, click here.

xxMelanie

Wednesday, November 17, 2010

This Week's Mission: Transfers!

"Everyone has a 'risk muscle.' You keep it in shape by trying new things. If you don't, it atrophies. Make a point of using it at least once a day."

~Roger Von Oech


So this week we did transfers, which is pretty much like making your own iron-ons without buying anything too special. We did three kinds of transfers: Packing tape transfers, roller transfers and acrylic medium transfers. All no brainers, and here they are.

The first kind of transfer is a packing tape transfer. If you have any ideas of how this could be useful in anyway, please tell me. First of all, you need a picture taken from a cheap glossy magazine. Apparently trashy tabloid magazines work the best. I searched through tonnes of images of skinny supermodels, pictures of Britney, Lyndsey and Paris, and all sorts of ads, and eventually found this image that was graphic and cartoon-like.


I put strips of packing tape over the image, making sure not to make any creases in the tape. I burnished it down, then put it in a basin of hot tap water. A few minutes of soaking, the paper comes off and leaves the ink stuck to the tape.

Soaking in water.

The transfer held up to the light after the paper had been rubbed off.

Now what would I do with this? I'm not really sure. But this Grade twelve student made a packing tape Marilyn Monroe dress. Nice and see through and ready for a night out on the town!
Woo hoo! Who needs to spend lavishly on clothes for the bar?

Next, We did roller transfers.

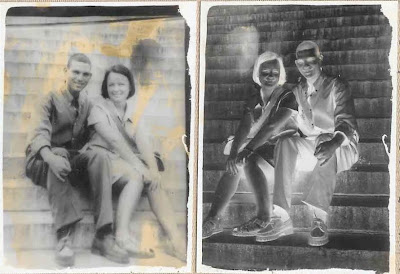
Me and Juan, or Carlos, or Fernando, or Luis or whoever on the steps of the Capitolio in Havana.

We were told to come to school armed with two photo copies. for this first project, I used an image glued into my Cuba travel journal. There is a story behind it so please indulge me.

I went to Cuba in 2001, and it was the first trip I ever took by myself. In Havana, the only place to check email and let my parents know I was okay was at the Capitolio Building. On the steps of the Capitolio, there was an old man who would take your photo with a pinhole camera for a few bucks. He'd first make a negative, then a positive from that negative. The photos looked old and cool and so I decided I wanted one for the book.

So I paid the few bucks and sat down, and this Cuban guy walked over to me and sat down too. I asked him what he wanted, and he said, "You can't let people back home think you were completely alone in Cuba. I'll sit here in the photo with you and you can make up whatever story you want about me later." So we posed, we took the picture, and I ran away with the negative and the positive, which made him a little mad because he was hoping to make his own picture after I left. But I liked the negative too! (and I paid for the photo, so it's mine!)

That is actually the true story. I don't even know this guy's name. But the photo looked old and I thought it would be forgiving in case I screwed up the transfer. Which I did, so it worked out in the end!

My Cuban transfer on 100% Cotton.

How to make this transfer: put Opus gel medium (Like and acrylic glue- once it dried it's like waterproof stretchy plastic- the same consistency as acrylic paint) on the picture with a paint brush. Once it's even, stick it to some fabric that has a smooth surface.

The almighty brayer: useful for many, many things.

Roll it with a brayer (Roller) so the entire surface of the paper is stuck to the fabric. Leave it to dry about a week, stick it in water and gently rub the paper off and voila! You've got yourself a transfer.

My friend Marlene took a look at this and said, "Why are you wearing a big hat in this picture?" That's me, rubbing my head too hard.

I admit, I screwed this one up a little, because I got it mixed up with the next project. So I had started to put several layers of gel medium on this picture before I changed gears. Had it only had one layer like everyone else's, I don't think I would have been able to rub a little of the original image off like I did here. Live and learn!

Several Layers Glue transfer (sounds so Chinese!)

My uber-downloaded postcard.

This project started with my second photocopy. I made this image several months ago and posted it on this blog. Twenty billion people downloaded it for some reason, so I figured it might be a good image to work with.

Painting acrylic medium over the photocopied image. Apparently you can use water resistant varnish too.

I painted a layer of gel medium, and let it dry completely. then I painted it again with gel medium and let it dry completely. I even took it home and continued to do this. Finally, this morning, I put it in water and rubbed the paper off the back and had myself a paper transfer which I adhered with more gel medium to a painted piece of canvas. the idea is that we were making a floor cloth (Like a painted canvas carpet on the floor) but I am not too sure I'd make a floor cloth like this. First of all, I don't think it would be very washable. Bit some of the fine arts students in our class liked the idea because it would be an easy way to put a photocopied image on a canvas and have it be the same consistency of the paint. (Painting around photocopies always looks cheesy.)

My floor cloth with the transfer. If I had any acrylic kicking around I might paint the edges of the medium in to cover it up. But I paint in watercolour, which would be useless here.

Anyway, those are this week's experiments. Again, not sure when I would do this in my own life, but it is an interesting exercise to spark other people's creativity.

Next two weeks: Silk Painting! Then we break for Christmas and I can get back to painting and block printing for a little while.

xxMelanie

Sunday, November 14, 2010

Naramata Artisan Faire!

See you at the
Naramata Artisan Faire!
The Heritage Inn, Naramata
December 5th, 11 to 4
We will have our scarves, paintings and jewelry for sale at this extra special Christmas Craft faire. Drop by and pay us a visit!

If you can't make the event, our scarves are also sold at the Penticton Art Gallery and Shades of Linen on Robinson Avenue in Naramata, or online at our ETSY shop (Click here.)

Happy Christmas Shopping!

xxMelanie

Monday, November 8, 2010

The Age of Experiment: Block Printing!


"Love of Beauty is Taste. The creation of beauty is Art."

Ralph Waldo Emerson

(and on that note, no art was made in this blog post! At least not yet!)


That's right, we did block printing on fabric this week in class. Sigh.

If you've been following this blog at all you know I can block print on fabric asleep and standing one one leg. I'm sure in the past year I have block printed at least 250 scarves. At least! So I wasn't very excited about this class, -and less excited when our instructor said she'd give us roughly cut blocks to work with. This meant even though I could come up with designs, I wouldn't be sure if they would fit on the block till I saw the block. So I did something I never do: I winged it.

It felt weird to come to class unprepared, without a design, especially for block printing. What if whatever I pulled off really sucked? This was supposed to be the one thing I would be good at.

Beets in the little pots, turmeric in the yellow pot, and red onion skins in the big pot.

Okay that is not entirely true. I was a little prepared. Remember the week before when we did tie-dye? Well, we were supposed to block print on our dyeing projects, for which I internally protested with a giant "Hell to the NO!" Block printing on tye dye? Images of marijuana leaves and peace signs, beer can pyramids and Canadian flag curtains came to mind.

So I did what any keener would do. I went to the fabric store, bought some 100% unbleached cotton, went to Maiwa handprints and bought some Potassium Aluminum Sulphate (which makes the dye stick to the fibre), went to Value Village and bought a big stock pot (went cheap and got the aluminum one when I probably should have sprung for the non-reactive stainless steel), went to the grocery store bought more red onion skins (They laughed at me trying to pay for onion skins and gave them to me for free. Why? Because the lady said I looked like a good girl. I said "only sometimes", And she said,"Even better!" (Oh who am I kidding?! I'm sadly, excruciatingly good all the time. Boo!)) Next think you know, I had three separate pots of beets, turmeric and red onion skins on the go.

(Truth be told, I wasn't so happy with the turn out of the colours. Wool is a protein fibre and so the structure or the fibre lends itself to being dyed. Cotton is a plant fibre and so it doesn't take the dye too well. The beets, for instance, barely affected the cotton at all- I ended up with a slightly pinkish colour. These have all been re-dyed now but I'll save that for a later blog)
My spontaneous design. I didn't like the flower in the middle in the end, so I changed it to something that looked more like a bulls eye/evil eye.

Anyway, back to block printing and class. I got my little bits of speedy cut, and pulled out my razor sharp exacto (I was afraid the class ones would be too dull, that's how much of a freak I can be about block printing!) and got to work. My idea was to try three concentric designs that I could fit together or not. Since I've never done this in block printing, I thought I would try to play with the idea of stamping a design to see what I could do with it.

I cut my design apart and made three separate stamps. The yellow stuff is really old speedy cut.
It's usually not this yellow.

Carving. Two things- I have paid my dues in block printing and have cut myself several times. Sometimes badly, requiring stitches, but years ago and I rarely cut myself now. As I busily worked on my design a few of my classmates (Mostly the boys, I must say!) hurriedly rushed past my chair holding a bleeding finger, asking if there were any bandaids around. To you guys I say, Welcome to block printing and completing your first right of passage! My instructor told them marks would be taken off for any blood spilled. Have I ever mentioned how much I love my instructor? She rocks.

The stamps after they've been cut and printed once with blue ink. See? No more flower.

But I admit, for me, watching them was brutally painful. My sister can attest to this, because she is a pretty good at carving blocks, but she is much slower than I am. It's painful for me to watch her, and I have offered to carve blocks for her in the past. So you can imagine my pain watching these guys try to carve blocks dull wood working tools, the rubber getting ripped out instead of cut. I wanted to offer to whip their blocks into shape but I am worried I am already getting the reputation of a 'know-it-some' in class so I tried to keep to myself. But at one point I couldn't handle it anymore and begged them to switch to sharper exactos. Which they did, and it seemed to help. Whew!
Woo Woo! Block-printing on tie-dye for shits and giggles. I told my instructor this one looked like the Eye of Sauron. She agreed. I also couldn't get past the fact that these kind of looked like boobies and nipples to me! Not a successful design experiment in my opinion! (You can't see anything else, now, can you?!!?)

So here is what I came up with. But my teacher seemed concerned I was going to ruin my carefully dyed little squares of cotton with my design right away. So I practiced on one piece of tie-dye I admit, I had tried to abandon as not mine, it was that ugly (picture above). This is hard for me; I like pretty things. So to make ugly things in the name of experiment is a little bit of a leap for me. But as you will see tonight, I made lots of ugly things, so now I can get back to pretty.
My instructor and I both agreed the block printing on the turmeric looked much more African tribal. She suggested the gold leaf and in the sprit of experiment I tried it. Wasn't a look I was crazy about though.

The beginning of my next project- which, is way more involved that I ever imagined and has already gone though massive changes. More on this one another time!

The new stamp- a little more henna and a lot less boobie!

Anyway, this week we are on to photo transfers- something I've never done, So I've got to get back to scouring my computer for images that might look good on a tile or a piece of fabric.

Till next time!
xxMelanie

Monday, November 1, 2010

Making Musa Proud: Weaving!

We sleep, but the loom of life never stops, and the pattern which was weaving when the sun went down is weaving when it comes up in the morning.

The carpet sellers (I've known for years) taking a break in Sultanahmet.
I've bought two kilims off these guys several years apart!

The day before I left Turkey I went to visit my old friend Harun, a gold and carpet seller in the Arasta Bazaar. If you've been to Istanbul, you'd know that carpet sellers are usually of seedy salubrious ilk, but I've known Harun for nine years now and he's a decent guy.

Sultanahmet Van kitties having a play in some intricate work.
"Here, I want to give you something to remember me by." A very common phrase heard throughout the markets of Istanbul, but instead of an evil eye speared by a pin, Harun threw me a pile of little bags made of old cut up kilims. I weeded through the pile, knowing that they probably gave these out as freebies. but it didn't matter. I still have the little kilim bag and I use it regularly and I do think of Harun when I see it.

My bag from Harun. I'm pretty sure the symbol is an evil eye.

And of course you know Musa if you've followed this blog at all. Musa, my carpet weaving landlord who kept me company in the mornings with his thumping of the loom as he created Kilims in his workshop below our apartment. Now that I am learning about natural dyes and weaving, I lament the fact I never coerced Musa into showing me his weaving tricks. (I'm sure he would have willingly shown me, I just wanted to use a saucy word like coerced!)

Musa busy at work!

So weaving was a little bittersweet for me; remembering my good pals Harun and Musa, so far away on the other side of the world, surrounded by gorgeous carpets and kilims and sumaks and suzannis and camel bags and all the other textiles I wished I could afford or fit in my suitcase. (That was the best part about living in Sultanahmet. I could visit my favourite textiles everyday if I wanted to without having to ever spend a penny!)

My cardboard loom with the warp threads.
Warp threads should be strong and smooth in order to let the weft threads move into position.
If they are too rough the warp will show and possibly break under the pressure.

Anyway, Musa had a proper loom he wove with. But since the university obviously didn't spring for twenty odd looms, we had to get a little ghetto and so we had our intro to weaving on cardboard looms we made ourselves.

My little weaving, separated by a knitting needle and a ruler to lift the warp threads.
I had a whole system going on! This is unusual though. I had spparated the weft threads to add black- usually this wouldn't need to be done.
I forgot my camera at home this day, but there wasn't much to photograph in the classroom, other than cutting some slits into cardboard and my classmates lifting the warp one by one to pass the yarn through, the room in silence as we concentrated on string and cardboard.

Our instructor told us to go half way up only. It was a very weird shaped bag at this point. I love the colours of the natural dyes together!

Here's a tip I learned from watching Musa: pass a ruler through the bottom to hold the smooth strong, warp threads apart, then you can easily pass the coloured yarn through. If you leave it in, you only have to lift every second time. My classmates thought it was genius. Thanks, Musa!

Since we were making little pouches, we had to flip the weaving over and do the backside as well as the front. I took advantage of the natural yarn lying around from the week before and decided that if Musa wove in naturally dyed thread, Dammit so would I!

When I got home, I decided a nice line of black would separate the colours nicely so I separated the weft and wove the black in. The black is the only chemically dyed colour in my bag. If you look closely, you will recognise my onion skin dying from the week before!

The warp threads cut and tied. But not really a look I was fond of. So I sewed a zipper in it and made it a little pencil bag.

We wove to about halfway up, and then we cut the warp threads. We tied two warps together in order to preserve the weaving, and slipped it out of it's cardboard loom. Mine already had a big problem- I left too big a space on the very ends of my cardboard loom, so my sides were very unstable. I fixed my problems by gluing the whole inside together with fusible hem tape and lined it with an old sock I got from the airplane long ago. One zipper installed and I have a new pencil bag!

I naturally dyed this wool. I created a loom. I spent a hours warping and wefting, flipping and rulering. I fusible hem-taped my sock to the insides. It took me days.

And I still probably wouldn't have looked twice at it in a Turkish Carpet store bargain bin.
But it's mine, and I love it.

xxMelanie